Homemade Breadsticks
There's something delightful about the act of making breadsticks from scratch. I still remember the first time I attempted it, with flour dusting my apron and the intoxicating aroma of freshly baked bread wafting through the kitchen. It was a small gathering, and there they were—fluffy, golden rods of dough being snatched up as soon as they hit the table. A simple side turned into a highlight of the meal, and I learned then that homemade breadsticks have a way of inviting people together.
Why make breadsticks, you ask? Because they're wonderfully versatile, and while they take a little bit of your time and love, the end result is truly rewarding. Whether served alongside a bowl of pasta, a soup, or even just on their own with a smear of butter, there’s a certain charm in hand-crafted bread that you can’t replicate from the store. Plus, I can’t think of a better way to greet guests than with a warm basket of these homemade beauties.
Why you'll love this recipe
Let me share why this homemade breadstick recipe deserves a spot in your kitchen. First, the texture is spot on: soft on the inside and slightly crisp on the outside, making them perfect for dipping or simply enjoying as is. The combination of garlic and Italian seasoning gives them a flavorful punch that’s especially comforting. And then there’s the butter—let’s not forget that; the melted butter brushed on right before baking elevates them even more, creating a rich and savory layer that no store-bought breadstick can compete with.
Making these breadsticks is also a lovely way to practice your skills without overwhelming yourself. You can knead, shape, and finally watch them rise, which is oddly satisfying and therapeutic. With every bite, you’ll understand that cooking is not just about feeding yourself but nurturing your surroundings and creating memories. Plus, they freeze beautifully, so you can have a stash ready for when the craving strikes.
Gather these ingredients
Here’s what you’ll need to create these delightful breadsticks:
- 6-7 cups All-purpose flour (divided): This is your base. Start with 6 cups, and you may add more as you knead. The way flour absorbs moisture will depend largely on humidity, so it’s good to have extra on hand.
- ¼ cup Granulated sugar: This subtle sweetness not only flavors the dough but also helps the yeast do its magic.
- 1 tablespoon Instant or quick yeast: No need for proofing here—just mix and go. Quick yeast means your breadsticks will be ready to enjoy even faster.
- 1 tablespoon Salt: Essential for flavoring. Don't skimp on it, as it balances the sweetness and enhances the overall taste.
- 1 teaspoon Italian seasoning: This herb blend infuses the dough with warmth and depth. If you’re partial to fresh herbs, feel free to use those as well.
- ½ teaspoon Garlic powder: This adds aromatic warmth; fresh minced garlic can be substituted for a more pronounced flavor.
- 2½ cups Warm water (105-110°F): To activate the yeast, we want it warm but not hot—similar to a cozy bath for your dough.
- ½ cup Salted butter (melted): This makes the dough rich and flavorful. You can swap it for olive oil if you prefer a lighter touch.
- ¼ cup Salted butter (melted, for brushing): The final flourish before baking, giving them that beautiful sheen and extra flavor.
- 1 teaspoon Italian seasoning: We’re repeating this here to brush on top before baking. It boosts the herb flavor beautifully.
- ½ teaspoon Garlic powder: Another sprinkle adds a delicious garlicky aroma right before they go into the oven.
- 1 pinch Salt: Just a little bit for good measure, enhancing the final flavor.
- 2 tablespoons Grated Parmesan cheese: Because who doesn’t love that nutty, savory kick?
How this recipe comes together
Ready to bring these breadsticks to life? Here’s how you’ll do it, step by step:
- In a large bowl (or a stand mixer bowl), stir together 1 cup of flour, the sugar, yeast, salt, Italian seasoning, and garlic powder. This is your dry mix.
- Add the warm water and melted butter, stirring until combined. You’ll see a soupy mixture forming, don’t worry—it’s supposed to look like that.
- Gradually add 2 more cups of flour, mixing with a spoon until it starts to pull away from the sides of the bowl.
- If you’re using a stand mixer fitted with the dough hook, gradually add the remaining 3 to 4 cups of flour, ½ cup at a time. As you add flour, reduce the amount used, ensuring the dough remains soft and slightly tacky but not sticky. If making by hand, once you can no longer stir, switch to kneading until you form a smooth dough.
- Cover the bowl and place it in a warm, draft-free area. Let the dough rise for at least 20 minutes, or up to 1½ hours if you have the time.
- Preheat your oven to 400°F (200°C). Line two baking sheets with parchment paper.
- When the dough is ready, uncover it and divide it into 4 equal pieces. Then take each piece and cut it into 6 equal portions, which will give you 24 pieces total. Keep the dough covered while you roll each one.
- Roll each piece into a smooth ball by pinching the seams together and rolling it in your hands. Then, place it on your countertop and roll it back and forth until it’s a cylinder about 6 inches long and 1 inch wide.
- Place the breadsticks on the prepared baking sheets, leaving about an inch between them.
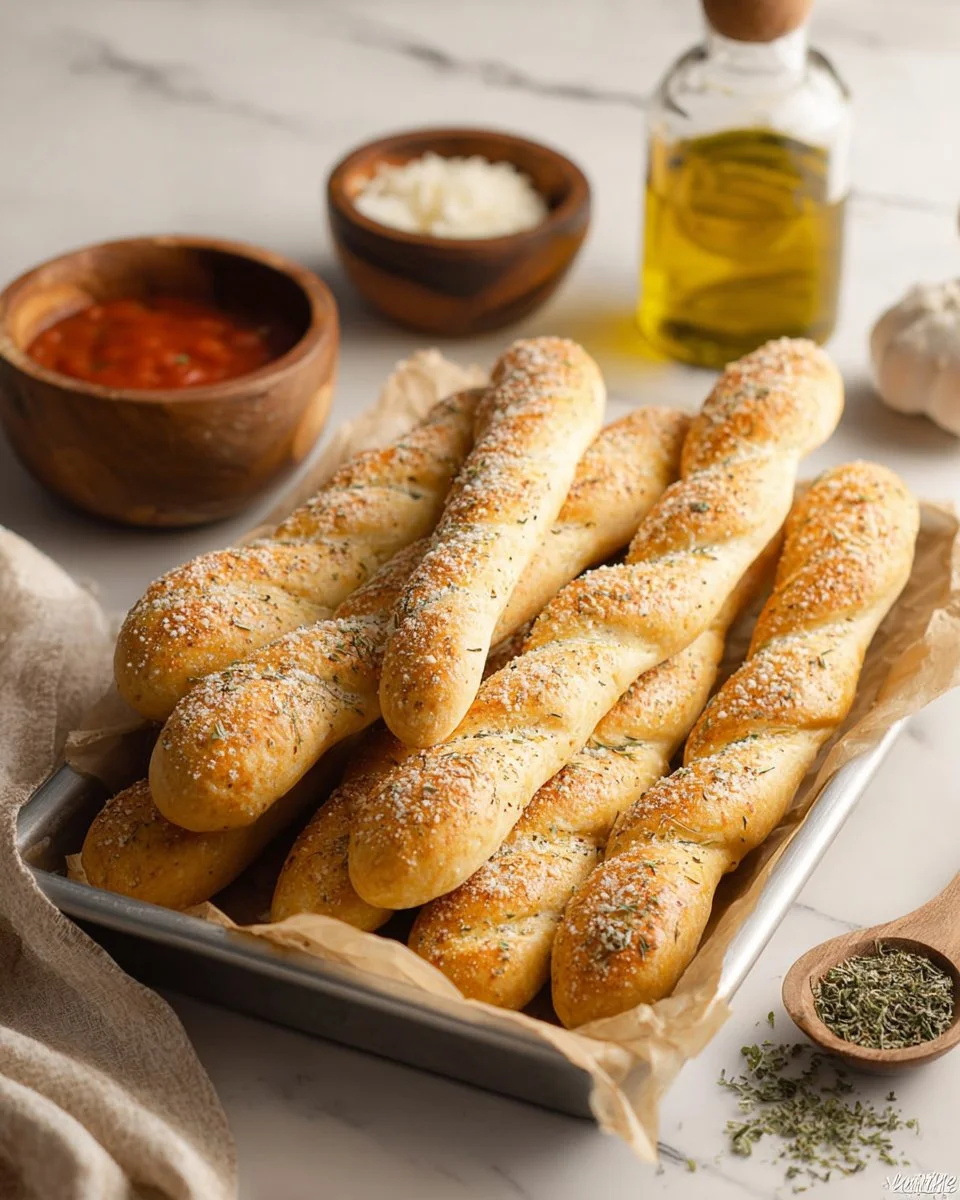
- Brush the tops with melted butter and sprinkle with the remaining Italian seasoning, garlic powder, salt, and Parmesan cheese.
- Bake for 13 to 15 minutes, or until they turn a light golden brown. Keep an eye on them—sudden browning can happen!
Best way to enjoy it
Serving these warm breadsticks straight from the oven is a must. They pair incredibly well with marinara sauce for dipping, or you can enjoy them alongside your favorite pasta dish or creamy soup. Try them with a fresh garden salad for a delightful combination of flavors. I also love to serve them with a drizzle of balsamic glaze or a sprinkle of fresh herbs for visual appeal. Just try not to eat them all in one go—though I wouldn’t blame you if you did.
Keeping leftovers fresh
If by some miracle you find yourself with leftovers, here's how to store them efficiently. Let the breadsticks cool completely before placing them in an airtight container. They’ll keep at room temperature for about two days, or in the fridge for up to a week. If you wish to prolong their life, you can freeze them for up to a month; just make sure to wrap them tightly to avoid freezer burn. When you're ready to enjoy them again, a quick spin in the oven will bring them back to life nicely.
Tips for a successful recipe
Here are a few nuggets of wisdom to ensure your breadsticks turn out beautifully:
- Pay attention to the dough—if it feels too dry or stiff, a splash of warm water can help soften it.
- During the rising phase, the dough should feel soft and slightly puffy. If it hasn’t risen much, the yeast might not have activated properly, possibly due to using water that was too hot or cold.
- For an added twist, try experimenting with different herbs or spices in the dough, such as rosemary or red pepper flakes for a hint of heat.
- And don’t hesitate to get your hands dirty! Kneading by hand can be quite fulfilling, and it allows you to really get a feel for the dough.
Creative twists
Feeling experimental? Here are a few twists you might want to try:
- Cheesy Breadsticks: Mix shredded mozzarella or cheddar into the dough or sprinkle it on top before baking for an extra cheesy finish.
- Spicy Variations: Add crushed red pepper flakes to the dough or toss some into the melted butter before brushing for a spicy kick.
- Herb-Infused Olive Oil: Swap butter for olive oil infused with herbs and garlic to brush on top. It adds a beautiful Mediterranean touch.
Ingredients
- 6-7 cups All-purpose flour (divided)
- ¼ cup Granulated sugar
- 1 tablespoon Instant or quick yeast
- 1 tablespoon Salt
- 1 teaspoon Italian seasoning
- ½ teaspoon Garlic powder
- 2½ cups Warm water (105-110°F)
- ½ cup Salted butter (melted)
- ¼ cup Salted butter (melted, for brushing)
- 1 teaspoon Italian seasoning (for topping)
- ½ teaspoon Garlic powder (for topping)
- 1 pinch Salt
- 2 tablespoons Grated Parmesan cheese
Directions to follow
- In a large bowl, mix together 1 cup of flour, sugar, yeast, salt, Italian seasoning, and garlic powder.
- Add warm water and melted butter, stirring until combined.
- Stir in 2 more cups of flour until it begins to pull away from the sides.
- If using a stand mixer, gradually add the remaining flour, kneading until soft and slightly tacky but not sticky.
- Cover the dough and let it rise in a warm spot for 20 minutes to 1½ hours.
- Preheat the oven to 400°F (200°C) and line two baking sheets with parchment paper.
- Divide the dough into 4 pieces, then into 24 small pieces total. Roll each piece into a smooth cylinder.
- Place the breadsticks on the baking sheets, about 1 inch apart.
- Brush tops with melted butter and sprinkle with seasoning and Parmesan cheese.
- Bake for 13 to 15 minutes until light golden brown. Enjoy warm!
Your questions answered
- Can I use whole wheat flour? Sure, go for half whole wheat and half all-purpose flour for more nutrition.
- How should I store leftovers? In an airtight container at room temperature for up to two days or refrigerated for a week.
- Can I freeze these? Yes, make sure they are completely cooled, then store in a freezer bag. Reheat in the oven.
- What if I don’t have instant yeast? You can activate active dry yeast in warm water first; just give it a bit of extra time to rise.
- Can I make these ahead of time? Absolutely. Prepare the dough and shape the sticks ahead. Refrigerate, then let them rise before baking.
Now that you've got this homemade breadstick recipe in your back pocket, it’s time to roll up your sleeves and get baking. There's nothing quite like the taste of freshly baked bread, and I hope this recipe brings warmth and happiness to your table. Don't hesitate to add your own personal twists; that’s the beauty of cooking. Enjoy the process, and I can’t wait to hear about your breadstick adventures! From my kitchen to yours.
Homemade Breadsticks
- Total Time: 45 minutes
- Yield: 24 breadsticks 1x
- Diet: Vegetarian
Description
Delightful homemade breadsticks that are soft on the inside and crispy on the outside, perfect for dipping or enjoying with meals.
Ingredients
- 6–7 cups All-purpose flour (divided)
- ¼ cup Granulated sugar
- 1 tablespoon Instant or quick yeast
- 1 tablespoon Salt
- 1 teaspoon Italian seasoning
- ½ teaspoon Garlic powder
- 2½ cups Warm water (105-110°F)
- ½ cup Salted butter (melted)
- ¼ cup Salted butter (melted, for brushing)
- 1 teaspoon Italian seasoning (for topping)
- ½ teaspoon Garlic powder (for topping)
- 1 pinch Salt
- 2 tablespoons Grated Parmesan cheese
Instructions
- In a large bowl, mix together 1 cup of flour, sugar, yeast, salt, Italian seasoning, and garlic powder.
- Add warm water and melted butter, stirring until combined.
- Stir in 2 more cups of flour until it begins to pull away from the sides.
- If using a stand mixer, gradually add the remaining flour, kneading until soft and slightly tacky but not sticky.
- Cover the dough and let it rise in a warm spot for 20 minutes to 1½ hours.
- Preheat the oven to 400°F (200°C) and line two baking sheets with parchment paper.
- Divide the dough into 4 pieces, then into 24 small pieces total. Roll each piece into a smooth cylinder.
- Place the breadsticks on the baking sheets, about 1 inch apart.
- Brush tops with melted butter and sprinkle with seasoning and Parmesan cheese.
- Bake for 13 to 15 minutes until light golden brown. Enjoy warm!
Notes
Serve warm with marinara sauce, pasta, or soup. Store leftovers in an airtight container for up to 2 days or refrigerate for a week.
- Prep Time: 30 minutes
- Cook Time: 15 minutes
- Category: Side Dish
- Method: Baking
- Cuisine: Italian
Nutrition
- Serving Size: 1 breadstick
- Calories: 150
- Sugar: 2g
- Sodium: 300mg
- Fat: 6g
- Saturated Fat: 3g
- Unsaturated Fat: 2g
- Trans Fat: 0g
- Carbohydrates: 20g
- Fiber: 1g
- Protein: 4g
- Cholesterol: 15mg
Keywords: breadsticks, homemade, Italian, baking