Oven-Fried Chicken Drumsticks
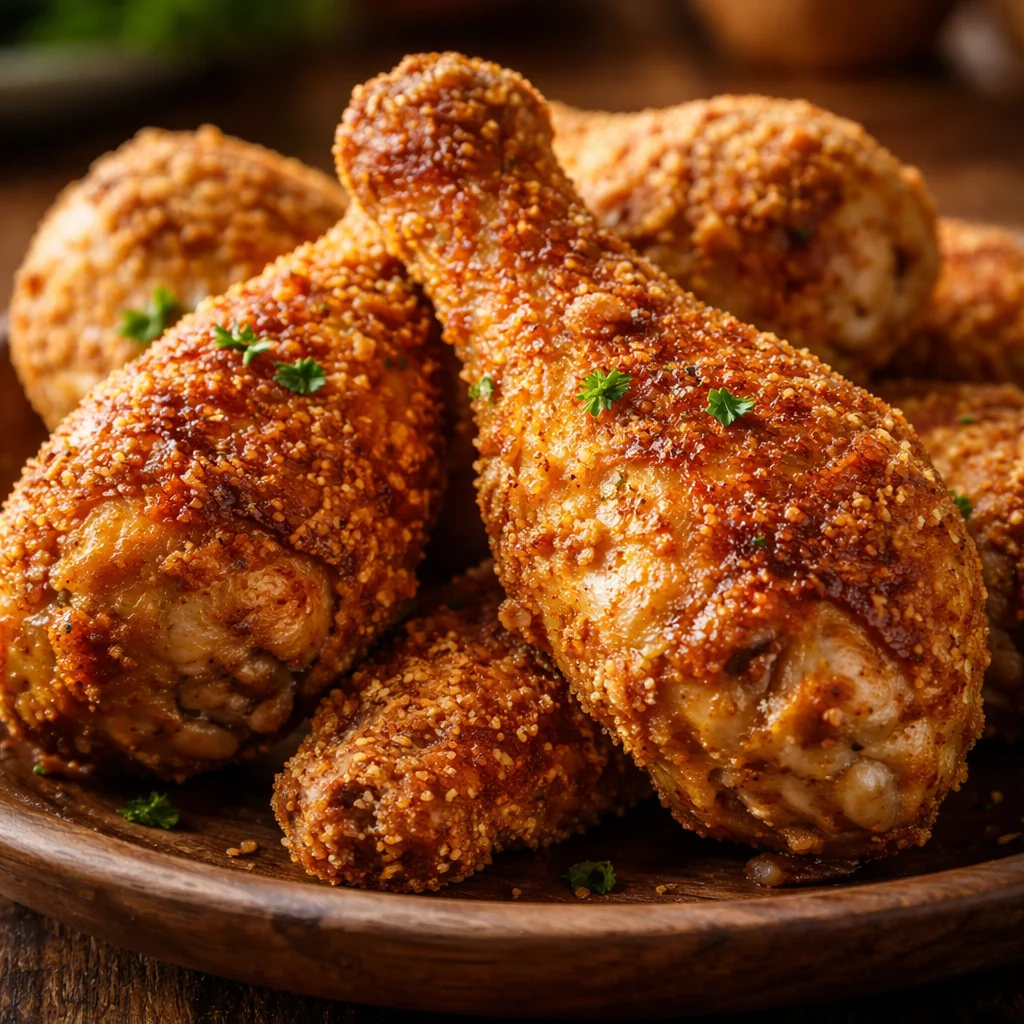
Oven-Fried Chicken Drumsticks are my weeknight lifesaver when I want that crunchy, fried vibe but I do not feel like dealing with a pot of oil. You know those nights when everyone is hungry, the kitchen is a mess, and you still want dinner to feel fun? This is that recipe. The outside gets crisp, the inside stays juicy, and you can tweak the seasoning a hundred different ways without messing it up. I have made these for picky kids, hungry adults, and my own snack cravings, and they never let me down. If you have drumsticks and an oven, you are basically halfway there.

How to Make Crispy Baked Chicken Drumsticks
The trick is giving the chicken a coating that bakes up crunchy, plus enough heat and airflow so it does not turn soggy. I also like using a rack on a sheet pan so the hot air can move underneath. If you do not have a rack, you can still do it, just flip the drumsticks a little more carefully.
What you will need
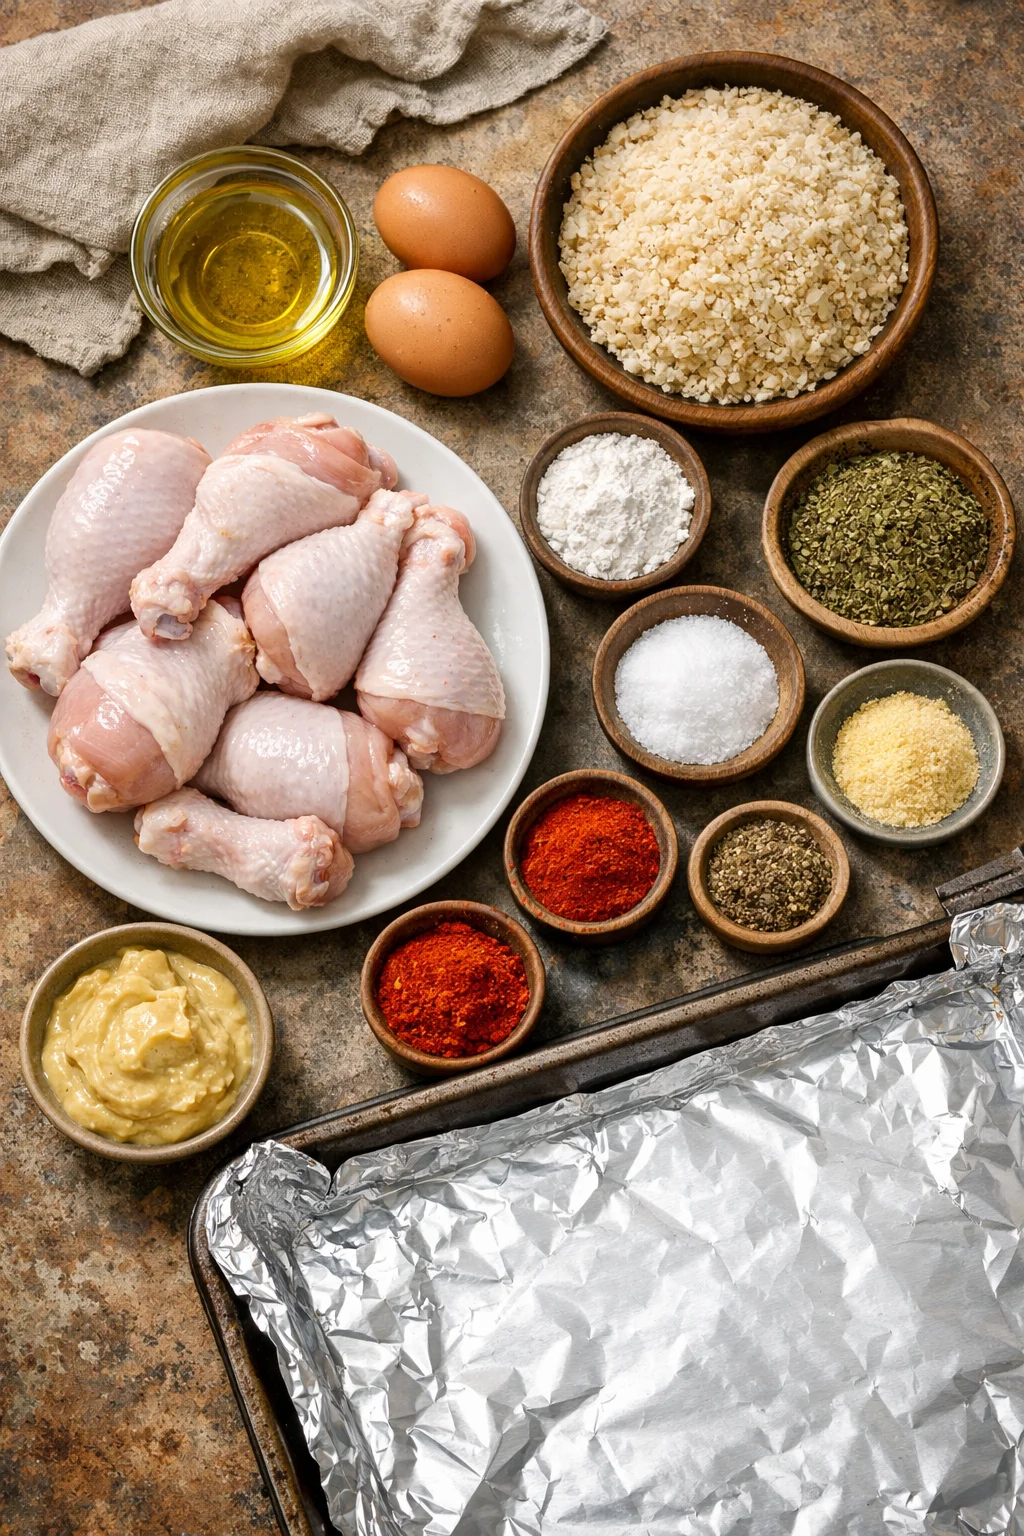
- Chicken drumsticks (about 8 to 12)
- Oil (just a little, like olive oil or avocado oil)
- Eggs (for sticking the coating)
- Panko breadcrumbs or crushed cornflakes (for crunch)
- Seasonings (I list my favorite combo in the next section)
- Salt and pepper
- A baking sheet and foil (easy cleanup)
- Optional but helpful: a wire rack
Step by step directions
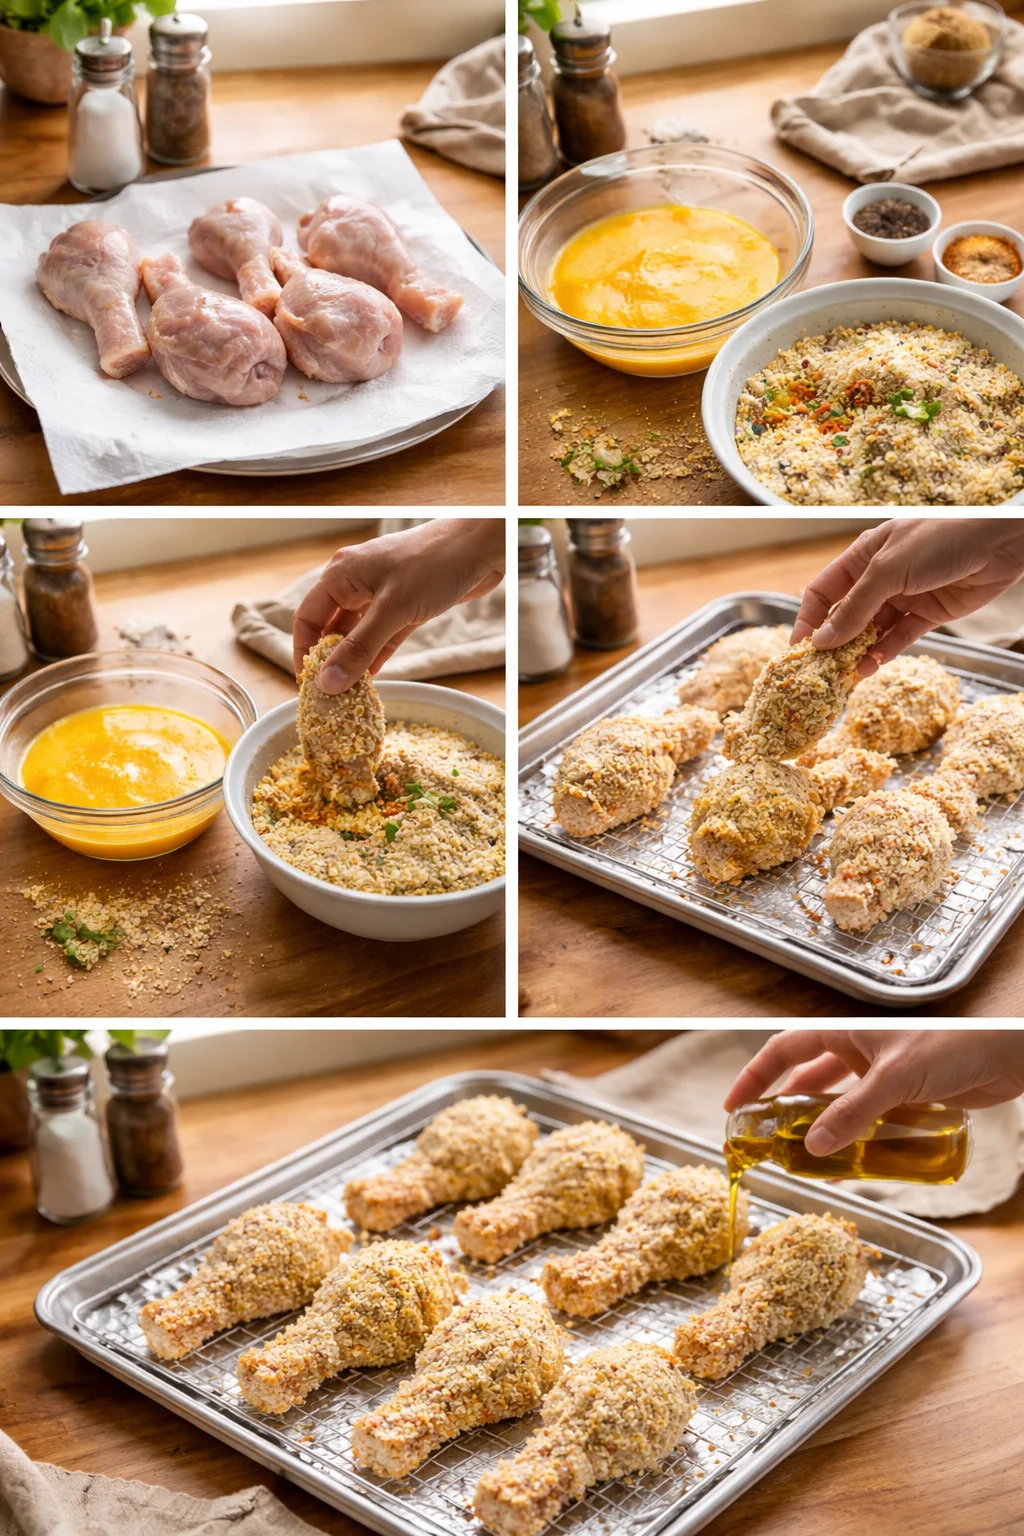
1) Heat your oven to 425 F. A hot oven is part of what makes these crisp.
2) Pat the drumsticks dry with paper towels. This matters more than people think. Moisture is the enemy of crunch.
3) Set up a simple dipping line: eggs in one bowl, crumbs in another bowl. Stir some seasoning into the crumbs so every bite tastes good.
4) Dip each drumstick in egg, let the excess drip off, then roll and press into the crumb mixture. Pressing helps the coating stick instead of sliding off later.
5) Place on a rack over a foil lined sheet pan. Lightly drizzle or spray with oil. You are not frying, just helping the coating brown.
6) Bake about 35 to 45 minutes depending on size, flipping once halfway through. I bake until the coating is deep golden and the juices run clear. If you have a thermometer, you want 165 F in the thickest part without touching bone.
These Oven-Fried Chicken Drumsticks come out with that satisfying crunch when you tap them with a fork. Also, let them rest for about 5 minutes before serving. It keeps the juices where they belong, inside the chicken.
Quick practical tip: If your coating is browning too fast but the chicken is not done, lower the oven to 400 F for the rest of the bake time.
Seasoning for Crispy Baked Chicken Drumsticks
Seasoning is where you can make this recipe feel like a totally different dinner every time. Some nights I go classic and savory, other nights I lean smoky, and sometimes I add a little sweetness if I know I am serving it with a tangy dip.
Here is my go to blend for Crispy Baked Chicken Drumsticks because it tastes like comfort food and it works with almost any side:
My favorite seasoning mix: salt, black pepper, garlic powder, onion powder, paprika, and a tiny pinch of cayenne.
I mix most of the seasoning right into the crumbs. Then I sprinkle a little extra salt on the chicken right after it comes out of the oven, just a light dusting. It wakes up all the flavors.
If you want to switch it up, try one of these easy vibes:
Italian-ish: add dried oregano and parsley, and a little grated parmesan in the crumbs.
BBQ-ish: add chili powder, smoked paprika, and a pinch of brown sugar.
Lemon pepper: add lemon zest to the crumb mix and use lemon pepper seasoning.
One small warning from my own trial and error: if you add a lot of sugar to the coating, it can brown quickly. Not a deal breaker, just keep an eye on it and tent with foil if you need to.
“I tried these on a Sunday game night and everyone thought I actually fried them. The crunch was unreal, and the chicken stayed juicy. This is going in our regular rotation.”
;
What to Serve with Crispy Baked Chicken Drumsticks
This is where you can make dinner feel balanced without doing anything complicated. Since the chicken is crunchy and savory, I like pairing it with something fresh or something creamy, and usually one easy carb because people love a little comfort on the plate.
- Classic coleslaw for crunch and tang
- Roasted broccoli or green beans for an easy veggie
- Mac and cheese if you want full comfort mode
- Mashed potatoes or baked potatoes, because they always work
- Corn on the cob when it is in season
- A simple side salad with a lemony dressing
- Dips: ranch, honey mustard, or a little hot sauce mixed into mayo
If I am serving these Oven-Fried Chicken Drumsticks to friends, I put out two dips and a big bowl of something crunchy like slaw. It feels like casual party food without the stress. And if there are leftovers, they reheat surprisingly well in the oven or air fryer. I avoid the microwave because it softens the coating, and then you lose that whole crispy situation we worked for.
How to Remove Skin from Chicken Drumsticks
You can absolutely make Crispy Baked Chicken Drumsticks with or without skin. With skin, you get extra flavor. Without skin, the seasoning comes through more directly, and some people just prefer it. I have done it both ways, and honestly it depends on who I am feeding.
Here is the easiest way I have found to remove the skin without making a mess:
1) Use paper towels to grip the skin. It is less slippery that way.
2) Start at the wide end of the drumstick and gently pull the skin down toward the thin end.
3) If it tears, just keep going in pieces. No big deal.
4) Use kitchen scissors to snip any stubborn bits near the knobby end.
5) Pat the drumsticks dry again before seasoning and coating.
Real talk: skinless drumsticks can dry out faster, so keep an eye on bake time and do not overcook them. A thermometer helps a lot if you have one. Also, do not skip the oil drizzle on top. It helps the coating get color and crunch even without the skin.
And yes, you can remove the skin and still get a crispy outside. The crumbs do the heavy lifting here.
More Chicken Drumstick Recipes
If you buy drumsticks in a big value pack like I do, it is nice to have a few different plans so you do not feel like you are eating the same dinner all week. Here are a few ideas I rotate through when I am not making Oven-Fried Chicken Drumsticks:
Sticky baked drumsticks: bake them until almost done, then brush on a quick sauce (BBQ, honey garlic, or teriyaki) and bake 5 to 8 minutes more.
Sheet pan drumsticks and veggies: toss potatoes, onions, and carrots with oil and salt, then roast everything together.
Garlic herb drumsticks: rub with oil, garlic, dried herbs, salt, and pepper. Simple and surprisingly good.
Spicy drumsticks: add extra cayenne or chili flakes, then serve with a cooling dip.
If you get the basic method down, you can take it anywhere. That is why I love this cut of chicken. It is forgiving, affordable, and it actually feels fun to eat with your hands.
Common Questions
How do I keep the coating from falling off?
Pat the chicken dry, dip in egg, and press the crumbs on firmly. Let the coated drumsticks sit for 5 minutes before baking so the coating can “set” a bit.
Do I need a wire rack?
No, but it helps. Without a rack, just flip the drumsticks carefully and do not overcrowd the pan.
Can I prep these ahead of time?
You can coat them and refrigerate for a few hours. If the crumbs look dry before baking, give the tops a light oil spray so they brown nicely.
How do I know when drumsticks are done?
They are done when the thickest part hits 165 F and the juices run clear. If they are very large, they can take closer to 45 minutes.
How do I reheat leftovers and keep them crispy?
Reheat in a 400 F oven for about 10 to 15 minutes. An air fryer works too. I avoid the microwave because it softens the crust.
A cozy ending and a little pep talk
If you are craving crunch but still want an easy cleanup dinner, these Oven-Fried Chicken Drumsticks are the move. Keep the chicken dry, bake it hot, and do not skip that little hit of oil on top for browning. Once you get the base version down, you can play with seasonings and sides and make it feel new every time. If you want another take and some extra tips, I also like checking out Perfect Oven-Fried Chicken Drumsticks – Domestic Dreamboat when I am in the mood to compare methods. Now go grab those drumsticks and make your kitchen smell amazing tonight.
Print
Crispy Baked Chicken Drumsticks
- Total Time: 50 minutes
- Yield: 4 servings 1x
- Diet: Paleo
Description
Deliciously crispy baked chicken drumsticks that are juicy on the inside and perfect for a quick weeknight dinner.
Ingredients
- 8 to 12 chicken drumsticks
- 2 tablespoons olive oil
- 2 eggs
- 1 cup panko breadcrumbs or crushed cornflakes
- Salt and pepper to taste
- Seasoning blend (garlic powder, onion powder, paprika, cayenne)
Instructions
- Heat your oven to 425°F.
- Pat the drumsticks dry with paper towels.
- Set up a simple dipping line: eggs in one bowl, crumbs in another.
- Dip each drumstick in egg, let the excess drip off, then roll and press into the crumb mixture.
- Place on a rack over a foil-lined sheet pan and lightly drizzle with oil.
- Bake for 35 to 45 minutes, flipping once halfway through, until cooked through.
- Let rest for about 5 minutes before serving.
Notes
Adjust seasonings based on preference. Pair with coleslaw, roasted veggies, or mac and cheese for a balanced meal.
- Prep Time: 10 minutes
- Cook Time: 40 minutes
- Category: Main Course
- Method: Baking
- Cuisine: American
Nutrition
- Serving Size: 1 serving
- Calories: 350
- Sugar: 1g
- Sodium: 400mg
- Fat: 20g
- Saturated Fat: 3g
- Unsaturated Fat: 15g
- Trans Fat: 0g
- Carbohydrates: 25g
- Fiber: 2g
- Protein: 30g
- Cholesterol: 80mg
Keywords: chicken, drumsticks, baked, crispy, dinner